PRODUCTS
Multi-Fit Bracket
There are 2 options of attaching this bracket to RV’s
OPTION 1 - PERMANANT FIT (NON POP TOP VANS)
Be aware at all times of electrical cable location in your RV when
permanently fitting.
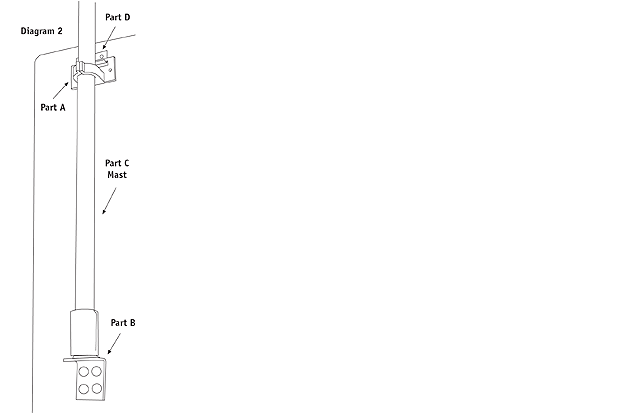
To permanently attach this bracket to the RV you start by drilling, (3.0mm), and screwing Part D (J Mould) as near as possible to the roof line to allow sufficient angle for Part C, the plastic mast pole to be fitted with the antenna head already fitted to the top of the pole. A minimum of 1 metre of pole should protrude above the roof-line.
Using bottom end of Part C (mast) as a guide, locate the correct fixing point for Part B on the RV wall. Remove Part C, drill, (3.0mm), and screw Part B to RV with snap caps to hide the screw head. Bottom of Part C (mast) drops into Part B, see Diagram 2. Refer to Diagram 1 for instructions on how to raise the antenna.
Whilst we provide screws for attaching, pop-riveting is a viable option. Also we recommend silicone sealing all holes prior to screwing or riveting.
It advised to shorten mast to approximately 70cm above roof line for DT8 Antenna. This allows for less movement in windy conditions and vertical reception.
The antenna final fit is described in NON PERMANANT fit below
Diagram & Information
Multi-Fit Bracket by Happy Wanderer Registered Design No’s 304316 & 304296 Australian Design Application Z1059/2007
2. Non-Permanent Fit Option (Although the J-Mould (Part D), screws and snaps caps are supplied, they are not needed for the on-permanent fitting described below)
Suitable for the DT8 & T-Bar Antenna
Contents of pack:
Part A: 1 x tube clamp (this is attached to the plastic mast pole)
Part B: 1 x 90 degree bracket with tube coupling with 4 x 15mm zinc plated screws and snap caps
Part C: 1 x 1.5m plastic mast pole
Part D: 1 x J-Mould with 2 larger screws
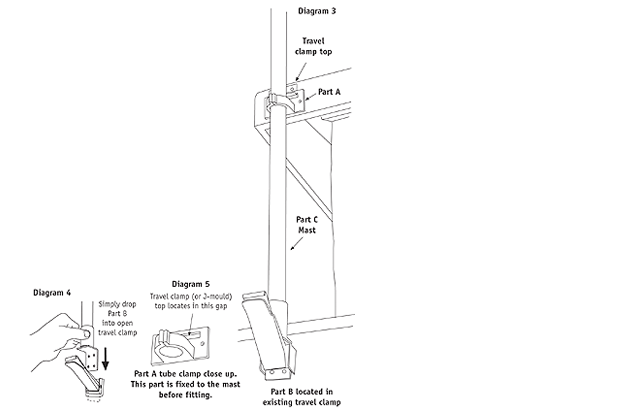
Only for pop top vans and campers with side roof travel clamps fitted.
This option utilises the roof lock down travel clamp when the roof is lifted up, meaning no screwing needed & you can use any corner of the van.
For standard Pop top vans
use the metal J mould (part D) is already fitted on your van at manafacture (the lock down travel clap)
In the case of high lift camper roofs
If the travel clamp is over 10cm from the top of the pop top roof, fit the plactic part D - J-Mould, supplied with bracket set,above the metal lock down J so that there is enought room to angle Part A, already fitted to the mast, with the antenna already attached into the J-Mould.
Part B is dropped into the travel clamp first.
The mast (Part C) which has Part A permantly attached is angled at about 30 degrees & part A fits over the J mould or metal part on van roof using the retangular slot in Part A.
The antenna head must be firmly pushed onto Mast (part C) before above final move is completed. Firmly so as it won't fall of and hurt you.
Once you pull mast down into part B it will not dislodge from van provided you use struts (see last point below).
The tight fit of part A on plastic mast ensures antenna will not rotate in windy conditions but is loose enough to rotate to get directional tune to tv transmitter.
Note: For campervans with high lifting roof the Multi-fit extension mast, (sold separately), must be purchased to achieve the extra height.
It advised to shorten mast to approximately 70cm above roof line for DT8 Antenna. This allows for less movement in windy conditions and vertical reception.
Pop top roof on some vans may sag or move in windy conditions. If so, you will need a strut to prevent sag. These are available from caravan accessory suppliers.